Intro
I’ve been fooling around with pulumi for a bit now, and thought I would write about it here.
What is it?
Pulumi is an infrastructure as code framework with a twist. You can use any language you like in order to write your code (within reason).
The pulumi tagline is Your cloud. Your language. Your way.
I’m here to say it’s true!
Why is it cool?
Pulumi is super cool because it means as a developer I can write infrastructure as code for my cloud based infrastructure in a language I am comfortable with.
This is a HUGE DIFFERENCE to learning an opinionated hybrid language for IAC.
Interestingly it also means I can write tests for my IAC in the same language I’m used to writing in. This is also a massive benefit.
I do not cover it here, but look out for another post soon.
Installation
Installation is simple, I am using AWS and will follow the docs at https://www.pulumi.com/docs/get-started/aws/begin/.
Install pulumi
In order to install pulumi, just as the docs say, use the following command:
curl -fsSL https://get.pulumi.com | sh
You will also need to install your language runtime - good news - for YAML, there is no language to install.
Next configure your AWS account in the normal way that you would
export AWS_ACCESS_KEY_ID=<YOUR_ACCESS_KEY_ID>
export AWS_SECRET_ACCESS_KEY=<YOUR_SECRET_ACCESS_KEY>
Create a new project
In order to get up and going once pulumi is installed you will need to install a new project.
To do this you use the commands:
mkdir quickstart
cd quickstart
pulumi new aws-yaml
By default this will create a project that has two files:
- Pulumi.yaml: This contains the program that manages your resources
name: quickstart
runtime: yaml
description: A minimal AWS Pulumi YAML program

resources:
  # Create an AWS resource (S3 Bucket)
  my-bucket:
    type: aws:s3:Bucket

outputs:
  # Export the name of the bucket
  bucketName: ${my-bucket.id}
- Pulumi.dev.yaml: This contains project level configuration
config:
  aws:region: ap-southeast-2
Default Project
The default project is fairly simple to understand and creates a bucket with an output. Let’s look at what else we can do that’s useful!
A more complex example
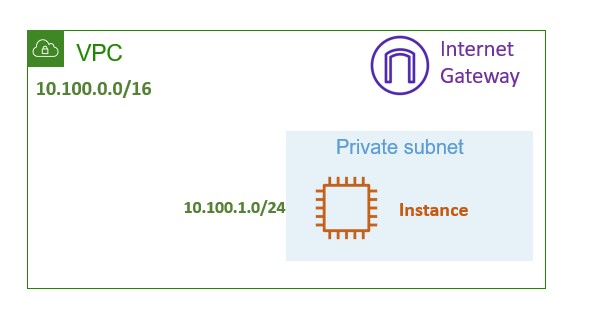
A more complex example requires a more complex explanation. What if I want to create something more akin to a real world use case in AWS?
What if I want to create a VPC, subnet, internet gateway, instance and security groups as a separate stack?
The image below is exactly what we are going to create.
AWS VPC
To create an AWS VPC we have the following code:
name: aws-yaml
runtime: yaml
description: A minimal AWS Pulumi YAML program

configuration:
  project_name:
    type: String
    default: pulumi-yaml
  vpc_name:
    type: String
    default: ${project_name}-vpc
resources:
  main_vpc:
    type: aws:ec2:Vpc
    properties:
      cidrBlock: 10.100.0.0/16
      tags:
        Name: ${vpc_name}
The code above does a few things that are interesting.
It sets up some variables that are used throughout the rest of the codebase. The variable project_name is set as a type string, and used defaults to pulumi-yaml. This is a standard yaml way of setting a variable.
The variable vpc_name is set as a type string, but uses the previously defined variable, project_name. This is a good example of how to use variables in yaml if you aren’t familiar.
The resources section builds the AWS resources for me. Each resource has a type and properties. These are defined as part of the API documention in pulumi.
In my case, I am creating a VPC, with a CIDR block and tagging it.
To run this code we use the command:
pulumi up -y
This produces:
     Type                 Name          Status
 +   pulumi:pulumi:Stack  aws-yaml-dev  created
 +   └─ aws:ec2:Vpc       main_vpc      created
AWS Subnet
The next step is to create an AWS subnet. This allows me to further carve up the VPC supernet.
The code for the next portion is as follows:
  main_subnet:
    type: aws:ec2:Subnet
    properties:
      vpcId: ${main_vpc.id}
      cidrBlock: 10.100.1.0/24
      mapPublicIpOnLaunch: True
      tags:
        Name: ${project_name}-subnet
Note that the type is different - the object is again a different API type. The vpcId is important as well. I am using the vpc object name from my previous piece of code, and the calulated id. This allows pulumi to calculate the vpc ID that was created in the previous step.
The output from running this looks like this:
     Type                 Name          Status
     pulumi:pulumi:Stack  aws-yaml-dev
 +   └─ aws:ec2:Subnet    main_subnet   created
Internet Gateway
The next step is to create an internet gateway for my new VPC. This will allow internet connectivity in and out of my VPC.
  internet_gateway:
    type: aws:ec2:InternetGateway
    properties:
      vpcId: ${main_vpc.id}
      tags:
        Name: ${project_name}-igw
Again I use the vpc ID and tag the asset with a tag that includes my project name that I defined above.
When I run this the output is as follows:
     Type                        Name              Status
     pulumi:pulumi:Stack         aws-yaml-dev
 +   └─ aws:ec2:InternetGateway  internet_gateway  created
Route table and Association
The next steps are to create both a route table and associate that route table with the internet gateway created above, as well as a subnet.
  route_table:
    type: aws:ec2:RouteTable
    properties:
      vpcId: ${main_vpc.id}
      routes:
        - cidrBlock: 0.0.0.0/0
          gatewayId: ${internet_gateway.id}
  route_table_assoc:
    type: aws:ec2:RouteTableAssociation
    properties:
      subnetId: ${main_subnet.id}
      routeTableId: ${route_table.id}
Again, the object identifier of vpc ID in object notation is used. I also use the internet gateway ID as well. For the route table association, I use the subnet identifier created above and the route table id.
When I run this, the output is as follows:
     Type                              Name               Status
     pulumi:pulumi:Stack               aws-yaml-dev
 +   ├─ aws:ec2:RouteTable             route_table        created
 +   └─ aws:ec2:RouteTableAssociation  route_table_assoc  created
Security Group
The next step is to create a security group and associate that security group with a VPC.
  security_group:
    type: aws:ec2:SecurityGroup
    properties:
      vpcId: ${main_vpc.id}
      ingress:
        - protocol: -1
          fromPort:  0
          toPort: 0
          cidrBlocks:
            - 0.0.0.0/0
      egress:
        - protocol: -1
          fromPort:  0
          toPort: 0
          cidrBlocks:
            - 0.0.0.0/0
      tags:
        Name: ${project_name}-sg
The output from this step when I run it is:
     Type                      Name            Status
     pulumi:pulumi:Stack       aws-yaml-dev
 +   └─ aws:ec2:SecurityGroup  security_group  created
Instance
The final step here is to create an instance within the newly created VPC and security groups.
  web:
    type: aws:ec2:Instance
    properties:
      ami: ${ubuntu.id}
      instanceType: t3.micro
      tags:
        Name: ${project_name}-instance
variables:
  ubuntu:
    Fn::Invoke:
      Function: aws:ec2:getAmi
      Arguments:
        mostRecent: true
        filters:
          - name: name
            values:
              - ubuntu/images/hvm-ssd/ubuntu-focal-20.04-*
          - name: virtualization-type
            values:
              - hvm
          - name: architecture
            values:
              - x86_64
The first part of the YAML creates an instance, and has the instance identifier and size as well as providing tags for the instance.
The instance identifier is a variable. The variable is updated with the output of a function.
This occurs dynamically.
The function calls the AWS API and gets the AMI based on the filters provided. This is set as a variable which can then be queried and walked through. Note that I use the identified ubuntu.id. This is the returned value from the function that is placed in the variable.
When I run this, I get the following output:
     Type                 Name          Status
     pulumi:pulumi:Stack  aws-yaml-dev
 +   └─ aws:ec2:Instance  web           created
End to end
End to end the entire yaml file looks like this:
name: aws-yaml
runtime: yaml
description: A minimal AWS Pulumi YAML program


configuration:
  project_name:
    type: String
    default: pulumi-yaml
  vpc_name:
    type: String
    default: ${project_name}-vpc
resources:
  main_vpc:
    type: aws:ec2:Vpc
    properties:
      cidrBlock: 10.100.0.0/16
      tags:
        Name: ${vpc_name}
  main_subnet:
    type: aws:ec2:Subnet
    properties:
      vpcId: ${main_vpc.id}
      cidrBlock: 10.100.1.0/24
      mapPublicIpOnLaunch: True
      tags:
        Name: ${project_name}-subnet
  internet_gateway:
    type: aws:ec2:InternetGateway
    properties:
      vpcId: ${main_vpc.id}
      tags:
        Name: ${project_name}-igw
  route_table:
    type: aws:ec2:RouteTable
    properties:
      vpcId: ${main_vpc.id}
      routes:
        - cidrBlock: 0.0.0.0/0
          gatewayId: ${internet_gateway.id}
  route_table_assoc:
    type: aws:ec2:RouteTableAssociation
    properties:
      subnetId: ${main_subnet.id}
      routeTableId: ${route_table.id}
  security_group:
    type: aws:ec2:SecurityGroup
    properties:
      vpcId: ${main_vpc.id}
      ingress:
        - protocol: -1
          fromPort:  0
          toPort: 0
          cidrBlocks:
            - 0.0.0.0/0
      egress:
        - protocol: -1
          fromPort:  0
          toPort: 0
          cidrBlocks:
            - 0.0.0.0/0
      tags:
        Name: ${project_name}-sg
  web:
    type: aws:ec2:Instance
    properties:
      ami: ${ubuntu.id}
      instanceType: t3.micro
      tags:
        Name: ${project_name}-instance
variables:
  ubuntu:
    Fn::Invoke:
      Function: aws:ec2:getAmi
      Arguments:
        mostRecent: true
        filters:
          - name: name
            values:
              - ubuntu/images/hvm-ssd/ubuntu-focal-20.04-*
          - name: virtualization-type
            values:
              - hvm
          - name: architecture
            values:
              - x86_64
When I run it from the beginning, I get the following output:
     Type                              Name               Status
 +   pulumi:pulumi:Stack               aws-yaml-dev       created
 +   ├─ aws:ec2:Vpc                    main_vpc           created
 +   ├─ aws:ec2:Instance               web                created
 +   ├─ aws:ec2:SecurityGroup          security_group     created
 +   ├─ aws:ec2:Subnet                 main_subnet        created
 +   ├─ aws:ec2:InternetGateway        internet_gateway   created
 +   ├─ aws:ec2:RouteTable             route_table        created
 +   └─ aws:ec2:RouteTableAssociation  route_table_assoc  created

Resources:
    + 8 created

Duration: 39s
Cleanup
Cleanup is just as easy.
pulumi delete -y
This deletes all of the resources that have been created.
     Type                              Name               Status
 -   pulumi:pulumi:Stack               aws-yaml-dev       deleted
 -   ├─ aws:ec2:RouteTableAssociation  route_table_assoc  deleted
 -   ├─ aws:ec2:RouteTable             route_table        deleted
 -   ├─ aws:ec2:Subnet                 main_subnet        deleted
 -   ├─ aws:ec2:SecurityGroup          security_group     deleted
 -   ├─ aws:ec2:InternetGateway        internet_gateway   deleted
 -   ├─ aws:ec2:Instance               web                deleted
 -   └─ aws:ec2:Vpc                    main_vpc           deleted

Resources:
    - 8 deleted

Duration: 1m2s
Conclusion
Pulumi rocks!
I don’t know how else to say it.
I can use a multitude of languages to create my cloud resources - languages that I’m familiar with and like.
This example is YAML - which isn’t quite a language, but has some characteristics of a language. I learned a few things about YAML and syntax through this process, and hopefully you did too.
Look out for my next post where I will walk through pulumi and python.