Intro
I’ve been fooling around with pulumi for a bit now, and thought I would write about it here. This is the third in a series of posts where I create the exact same infrastructure using pulumi in YAML, Python and Javascript.
What is it?
Pulumi is an infrastructure as code framework with a twist. You can use any language you like in order to write your code (within reason).
The pulumi tagline is Your cloud. Your language. Your way.
I’m here to say it’s true!
I’ve previously written about using pulumi and yaml and python. This particular post is about pulumi and javascript.
I’m going to create the exact same cloud infrastructure as the last post, but this time, I’m using javascript instead of yaml or python.
Installation
Installation is simple, I am using AWS and will follow the docs at https://www.pulumi.com/docs/get-started/aws/begin/.
Install pulumi
In order to install pulumi, just as the docs say, use the following command:
curl -fsSL https://get.pulumi.com | sh
You will also need to install your language runtime - for me this is javascript. If you’re using an up to date version of ubuntu then you should have a relatively new version of javascript and everything should work fine.
Next configure your AWS account in the normal way that you would
export AWS_ACCESS_KEY_ID=<YOUR_ACCESS_KEY_ID>
export AWS_SECRET_ACCESS_KEY=<YOUR_SECRET_ACCESS_KEY>
Create a new project
In order to get up and going once pulumi is installed you will need to install a new project.
To do this you use the commands:
mkdir quickstart
cd quickstart
pulumi new aws-javascript
By default this will create a project and a javascript project template for you.
If you do not use any command line switches, then by default you will be asked for information about the stack that you are creating.
[root@fedora foo]# pulumi new
Please choose a template (30/221 shown):
 aws-javascript                     A minimal AWS JavaScript Pulumi program
This command will walk you through creating a new Pulumi project.

Enter a value or leave blank to accept the (default), and press <ENTER>.
Press ^C at any time to quit.

project name: (foo)
project description: (A minimal AWS JavaScript Pulumi program)
Created project 'foo'

Please enter your desired stack name.
To create a stack in an organization, use the format <org-name>/<stack-name> (e.g. `acmecorp/dev`).
stack name: (dev)
Created stack 'dev'

aws:region: The AWS region to deploy into: (us-east-1)
Saved config

Installing dependencies...

(⠂⠂⠂⠂⠂⠂⠂⠂⠂⠂⠂⠂⠂⠂⠂⠂⠂⠂) ⠧ idealTree:foo: sill idealTree buildDeps
This installs the required dependencies and also creates a boilerplate for you to use.
If you check in the pulumi web console, the stack is created automatically as well.
Files
Within the directory, you will see a number of files. There are additional files as compared to the YAML example in the previous post. The yaml files are part of every pulumi project. The other files are specific to the language being used - in this case, python.
- Pulumi.yaml defines the project itself.
name: foo
runtime:
  name: nodejs
  options:
    typescript: false
description: A minimal AWS JavaScript Pulumi program
- Pulumi.dev.yaml defines the environment and any environment specifics.
config:
  aws:region: ap-southeast-2
- package.json is a standard javascript package manifest.
{
    "name": "foo",
    "main": "index.js",
    "dependencies": {
        "@pulumi/pulumi": "^3.0.0",
        "@pulumi/aws": "^5.0.0",
        "@pulumi/awsx": "^1.0.0"
    }
}
- index.js is the javascript file where all of your code goes. By default the AWS template for pulumi creates a boilerplate example that has an example of creating an S3 bucket.
"use strict";
const pulumi = require("@pulumi/pulumi");
const aws = require("@pulumi/aws");
const awsx = require("@pulumi/awsx");

// Create an AWS resource (S3 Bucket)
const bucket = new aws.s3.Bucket("my-bucket");

// Export the name of the bucket
exports.bucketName = bucket.id;
The code
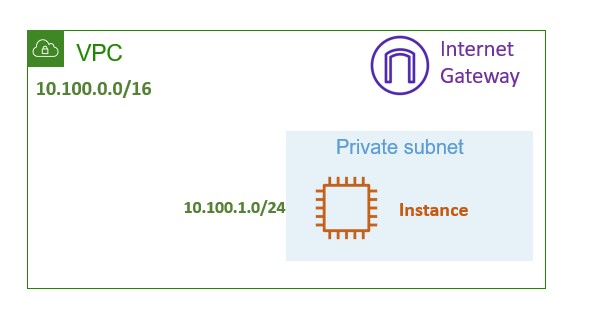
Now let’s get coding. The following sections represent what we are going to build. We are going to build the exact same infrastructure that we built the last time. The diagram below represents the infrastructure that we will build.
Variables
I set some variables to begin with. These are usually names for various objects as part of the codebase. Each name that I set. All of the variables are really just to name things nicely and consistently. It also means that in order to change my project, I just need to change the variables.
var var_size = 't2.micro'
var var_project_name = "pulumi-javascript"
var var_vpc_name = "vpc"
var var_key_name = 'svk_keypair'
var var_vpc_cidr_block = '10.100.0.0/16'
var var_subnet_cidr_block = '10.100.1.0/24'
Each of the variables relates to objects we are going to build next.
AWS VPC
To create an AWS VPC we have the following code:
const vpc = new aws.ec2.Vpc(var_project_name + "-" + var_vpc_name, {
  cidrBlock: var_vpc_cidr_block,
  tags: {
    "Name": var_project_name + "-" + var_vpc_name,
  }
});
This piece of code creates a VPC. It also uses the variables that we defined above. I have a habit of using the project name in all of the resources and then tagging the resources as well.
These resources will be tagged as pulumi-javascript-vpc.
AWS Subnet
The next step is to create an AWS subnet. This allows me to further carve up the VPC supernet.
The code for the next portion is as follows:
const main_subnet = new aws.ec2.Subnet(var_project_name + var_vpc_name + "-subnet", {
  vpcId: vpc.id,
  cidrBlock: var_subnet_cidr_block,
  mapPublicIpOnLaunch: true,
  tags: {
          "Name": var_project_name + "-subnet"
  }
});
I am using the CIDR block that I defined at the begining of my code. The vpcId is important as well. I am using the vpc object name from my previous piece of code, and the calulated id. This allows pulumi to calculate the vpc ID that was created in the previous step.
As we go through the code, each resource will use identifiers from the resources that were created before it.
Internet Gateway
The next step is to create an internet gateway for my new VPC. This will allow internet connectivity in and out of my VPC.
const main_igw = new aws.ec2.InternetGateway(var_project_name + "-" + var_vpc_name + "-igw", {
  vpcId: vpc.id,
  tags: {
          "Name": var_project_name + "-igw"
  }
});
Again I use the vpc ID and tag the asset with a tag that includes my project name that I defined above.
In a lot of ways this is simpler than the constructs used when we use YAML as a DSL. I think this is because we are using API’s and interfaces that are somewhat native to javascript. For example, you will note that the variables are assigned as standard javascript variables.
Route table and Association
The next steps are to create both a route table and associate that route table with the internet gateway created above, as well as a subnet.
const main_route_table = new aws.ec2.RouteTable(var_project_name + "-" + var_vpc_name + "-rt", {
  vpcId: vpc.id,
  routes:
  [
    {
      cidrBlock: "0.0.0.0/0",
      gatewayId: main_igw.id,
    },
  ],
  tags:
  {
      "Name": var_project_name + "-rt"
  }
});


const main_rt_assoc = new aws.ec2.RouteTableAssociation(var_project_name + "-" + var_vpc_name + "-rta", {
    subnetId: main_subnet.id,
    routeTableId: main_route_table.id
 }
);
Again, the object identifier of vpc ID in object notation is used. I also use the internet gateway ID as well. For the route table association, I use the subnet identifier created above and the route table id.
Security Group
The next step is to create a security group and associate that security group with a VPC.
const group = new aws.ec2.SecurityGroup(var_project_name + "-" + var_vpc_name + "-sg", {
  description: "foo",
  vpcId: vpc.id,
  ingress: [{
    description: "Ingress",
    fromPort: 0,
    toPort: 0,
    protocol: "-1",
    cidrBlocks: ["0.0.0.0/0"],
  }],
  egress: [{
    fromPort: 0,
    toPort: 0,
    protocol: "-1",
    cidrBlocks: ["0.0.0.0/0"],
  }],
});
The security group is created with ingress and egress rules that are overly permissive as part of this demonstration series.
Instance
The final step here is to create an instance within the newly created VPC and security groups. In order to do that, I need to select an instance type to spin up in AWS. I could just pass the ami ID, but that’s not particularly portable. Each region has different ami ID’s for the same instance. A much more portable way of doing this is to use a data source. I use the aws.ec2.get_ami data source. This allows me to search for an ami, and filter it based on its attributes. This data source returns the ami ID that I can use. Using this method the ami ID is potable and the code can be used across regions.
const ami = new aws.ec2.getAmi({
  mostRecent: true,
  owners: ["099720109477"],
  filters: [
    {
      name: "name",
      values: ["ubuntu/images/hvm-ssd/ubuntu-focal-20.04*"]
    },
    {
      name: "virtualization-type",
      values: ["hvm"]
    },
    {
      name: "architecture",
      values: ["x86_64"],
    },
  ],
});
Next I create an instance and pass user data to it.
Tip
When passing inline userdata like this in pulumi, I found that the shebang and shell needed to be on the same line as the backticks enclosing the userdata portion. In this case I have just echoed the word foo to a file in /tmp. This is a simple test to validate that my userdata is being run correctly and as expeted.
const user_data =`#!/bin/bash
echo "foo" > /tmp/foo`
Then I instantiate an instance. This is fairly standard in terms of the pulumi lifecycle and how to make an instance work. I pass in all of the variables that I have defined up above, and I also pass in my user data.
const server = new aws.ec2.Instance(var_project_name + "-" + var_vpc_name + "-instance",{
  ami: ami.then(ami => ami.id),
  instanceType: "t2.micro",
  subnetId: main_subnet.id,
  userData: user_data,
  tags: {
    "Name": var_project_name + "-instance",
  },
});
End to end
End to end the entire python file looks like this:
"use strict";
const pulumi = require("@pulumi/pulumi");
const aws = require("@pulumi/aws");
const awsx = require("@pulumi/awsx");

var var_size = 't2.micro'
var var_project_name = "pulumi-javascript"
var var_vpc_name = "vpc"
var var_key_name = 'svk_keypair'
var var_vpc_cidr_block = '10.100.0.0/16'
var var_subnet_cidr_block = '10.100.1.0/24'

const vpc = new aws.ec2.Vpc(var_project_name + "-" + var_vpc_name, {
  cidrBlock: var_vpc_cidr_block,
  tags: {
    "Name": var_project_name + "-" + var_vpc_name,
  }
});

const main_subnet = new aws.ec2.Subnet(var_project_name + var_vpc_name + "-subnet", {
  vpcId: vpc.id,
  cidrBlock: var_subnet_cidr_block,
  mapPublicIpOnLaunch: true,
  tags: {
          "Name": var_project_name + "-subnet"
  }
});

const main_igw = new aws.ec2.InternetGateway(var_project_name + "-" + var_vpc_name + "-igw", {
  vpcId: vpc.id,
  tags: {
          "Name": var_project_name + "-igw"
  }
});


const main_route_table = new aws.ec2.RouteTable(var_project_name + "-" + var_vpc_name + "-rt", {
  vpcId: vpc.id,
  routes:
  [
    {
      cidrBlock: "0.0.0.0/0",
      gatewayId: main_igw.id,
    },
  ],
  tags:
  {
      "Name": var_project_name + "-rt"
  }
});


const main_rt_assoc = new aws.ec2.RouteTableAssociation(var_project_name + "-" + var_vpc_name + "-rta", {
    subnetId: main_subnet.id,
    routeTableId: main_route_table.id
 }
);


const ami = new aws.ec2.getAmi({
  mostRecent: true,
  owners: ["099720109477"],
  filters: [
    {
      name: "name",
      values: ["ubuntu/images/hvm-ssd/ubuntu-focal-20.04*"]
    },
    {
      name: "virtualization-type",
      values: ["hvm"]
    },
    {
      name: "architecture",
      values: ["x86_64"],
    },
  ],
});

const group = new aws.ec2.SecurityGroup(var_project_name + "-" + var_vpc_name + "-sg", {
  description: "foo",
  vpcId: vpc.id,
  ingress: [{
    description: "Ingress",
    fromPort: 0,
    toPort: 0,
    protocol: "-1",
    cidrBlocks: ["0.0.0.0/0"],
  }],
  egress: [{
    fromPort: 0,
    toPort: 0,
    protocol: "-1",
    cidrBlocks: ["0.0.0.0/0"],
  }],
});

const user_data =`#!/bin/bash
echo "foo" > /tmp/foo`

const server = new aws.ec2.Instance(var_project_name + "-" + var_vpc_name + "-instance",{
  ami: ami.then(ami => ami.id),
  instanceType: "t2.micro",
  subnetId: main_subnet.id,
  userData: user_data,
  tags: {
    "Name": var_project_name + "-instance",
  },
});
When I run it from the beginning, I get the following output:
[root@fedora aws-javascript]# pulumi up -y
Previewing update (dev)

View in Browser (Ctrl+O): https://app.pulumi.com/codecowboydotio/aws-javascript/

     Type                              Name                            Plan
 +   pulumi:pulumi:Stack               aws-javascript-dev              create
 +   ├─ aws:ec2:Vpc                    pulumi-javascript-vpc           create
 +   ├─ aws:ec2:InternetGateway        pulumi-javascript-vpc-igw       create
 +   ├─ aws:ec2:SecurityGroup          pulumi-javascript-vpc-sg        create
 +   ├─ aws:ec2:Subnet                 pulumi-javascriptvpc-subnet     create
 +   ├─ aws:ec2:RouteTable             pulumi-javascript-vpc-rt        create
 +   ├─ aws:ec2:RouteTableAssociation  pulumi-javascript-vpc-rta       create
 +   └─ aws:ec2:Instance               pulumi-javascript-vpc-instance  create


Resources:
    + 8 to create

Updating (dev)

View in Browser (Ctrl+O): https://app.pulumi.com/codecowboydotio/aws-javascript/

     Type                              Name                            Status
 +   pulumi:pulumi:Stack               aws-javascript-dev              created (4s)
 +   ├─ aws:ec2:Vpc                    pulumi-javascript-vpc           created (6s)
 +   ├─ aws:ec2:InternetGateway        pulumi-javascript-vpc-igw       created (1s)
 +   ├─ aws:ec2:Subnet                 pulumi-javascriptvpc-subnet     created (12s)
 +   ├─ aws:ec2:SecurityGroup          pulumi-javascript-vpc-sg        created (5s)
 +   ├─ aws:ec2:RouteTable             pulumi-javascript-vpc-rt        created (2s)
 +   ├─ aws:ec2:RouteTableAssociation  pulumi-javascript-vpc-rta       created (1s)
 +   └─ aws:ec2:Instance               pulumi-javascript-vpc-instance  created (26s)


Resources:
    + 8 created

Duration: 56s
Cleanup
Cleanup is just as easy.
pulumi destroy -y
This deletes all of the resources that have been created.
[root@fedora aws-javascript]# pulumi destroy -y
Previewing destroy (dev)

View in Browser (Ctrl+O): https://app.pulumi.com/codecowboydotio/aws-javascript/

     Type                              Name                            Plan
 -   pulumi:pulumi:Stack               aws-javascript-dev              delete
 -   ├─ aws:ec2:RouteTableAssociation  pulumi-javascript-vpc-rta       delete
 -   ├─ aws:ec2:Instance               pulumi-javascript-vpc-instance  delete
 -   ├─ aws:ec2:RouteTable             pulumi-javascript-vpc-rt        delete
 -   ├─ aws:ec2:InternetGateway        pulumi-javascript-vpc-igw       delete
 -   ├─ aws:ec2:SecurityGroup          pulumi-javascript-vpc-sg        delete
 -   ├─ aws:ec2:Subnet                 pulumi-javascriptvpc-subnet     delete
 -   └─ aws:ec2:Vpc                    pulumi-javascript-vpc           delete


Resources:
    - 8 to delete

Destroying (dev)

View in Browser (Ctrl+O): https://app.pulumi.com/codecowboydotio/aws-javascript/

     Type                              Name                            Status
 -   pulumi:pulumi:Stack               aws-javascript-dev              deleted
 -   ├─ aws:ec2:RouteTableAssociation  pulumi-javascript-vpc-rta       deleted (4s)
 -   ├─ aws:ec2:RouteTable             pulumi-javascript-vpc-rt        deleted (1s)
 -   ├─ aws:ec2:Instance               pulumi-javascript-vpc-instance  deleted (32s)
 -   ├─ aws:ec2:InternetGateway        pulumi-javascript-vpc-igw       deleted (1s)
 -   ├─ aws:ec2:Subnet                 pulumi-javascriptvpc-subnet     deleted (1s)
 -   ├─ aws:ec2:SecurityGroup          pulumi-javascript-vpc-sg        deleted (1s)
 -   └─ aws:ec2:Vpc                    pulumi-javascript-vpc           deleted (0.82s)


Resources:
    - 8 deleted

Duration: 43s

The resources in the stack have been deleted, but the history and configuration associated with the stack are still maintained.
If you want to remove the stack completely, run `pulumi stack rm dev`.
Conclusion
Pulumi is a revolution in IaC. I don’t know how else to say it.
I can use a multitude of languages to create my cloud resources - languages that I’m familiar with and like.
This example is javascript. So far I’ve done an example in YAML, python and now one in javascript. They create the exact same things. This means that no matter which programming language I’m familiar with, I can create a stack and have that stack work the way I want it to. There is no need for me to learn a complete new DSL just to do my infrastructure as code.