Intro
I’ve been doing a bit of work recently with different CI tools. One of the ones that I’ve been using is buildkite.
You can find out more about buildkite buildkite.com
Infrastructure
In order to use buildkite, I need to stand up a buildkite agent, or a runner. In builtkite terms its called an agent.
I am going to stand up all of my infrastructure using Infrastructure as Code (IaC). My chosen IaC framework is pulumi.
You can learn more about pulumi pulumi.com
Stand up buildkite agent
I am going to stand up my buildkite agent as a server in AWS. I’m using python to stand up my agent - this is somewhat ubiquitous, and most people understand python. Pulumi supports other languages, but for this blog I’m using python.
Set up some variables.
First step is to set up some variables for use within our pulumi project.
The variables are standard AWS constructs that will be used to build out the AWS scaffolding around my pulumi agent.
I import the pulumi libraries, then set up a number of variables to represent different pieces of AWS infrastrcutre.
var_size = size of the AWS instance var_project_name = represents the project name - this is used throughout the build as a label for all of the AWS assets that are built. var_vpc_name = the name of the AWS VPC var_key_name = the name of the AWS ssh key that will be provisioned to the instance. var_vpc_cidr_block = the supernet for the AWS VPC. var_subnet_cidr_block = the subnet that will be created within the supernet.
"""An AWS Python Pulumi program for a buildkite runner"""

import pulumi
import pulumi_aws as aws

config = pulumi.Config()

var_size = 't2.2xlarge'
var_project_name = "pulumi-python-buildkite-runner"
var_vpc_name = "vpc"
var_key_name = 'keypair'
var_vpc_cidr_block = '10.100.0.0/16'
var_subnet_cidr_block = '10.100.1.0/24'
The next piece of the infrastructure build is to build the various AWS components. The following pieces of code build out an AWS VPC and a subnet that is associated to the subnet.
vpc = aws.ec2.Vpc(
        var_project_name + "-" + var_vpc_name,
        cidr_block=var_vpc_cidr_block,
        tags={
          "Name": var_project_name + "-" + var_vpc_name,
        }
)

main_subnet = aws.ec2.Subnet(var_project_name + "-subnet",
    vpc_id=vpc.id,
    cidr_block=var_subnet_cidr_block,
    map_public_ip_on_launch=True,
    tags={
        "Name": var_project_name + "-subnet"
    }
)
The next piece of code builds out an internet gateway and a route table. It also associates the subnet we created earlier with the route table via a route table association.
main_igw = aws.ec2.InternetGateway(var_project_name + "-" + var_vpc_name + "-igw",
    vpc_id=vpc.id,
    tags={
        "Name": var_project_name + "-igw"
    }
)

main_route_table = aws.ec2.RouteTable(var_project_name + "-" + var_vpc_name + "-rt",
    vpc_id=vpc.id,
    routes=[
        aws.ec2.RouteTableRouteArgs(
            cidr_block="0.0.0.0/0",
            gateway_id=main_igw.id,
        ),
    ],
    tags={
        "Name": var_project_name + "-rt"
    }
)

main_rt_assoc = aws.ec2.RouteTableAssociation(var_project_name + "-" + var_vpc_name + "-rt",
    subnet_id = main_subnet.id,
    route_table_id = main_route_table.id
)
Each of these pieces of code references the previous sections to build up all of the infrastructure we need in order to make the entire stack function properly.
The next section of code is a filter that uses the get_ami function of pulumi for AWS to select the appropriate AMI. This is important. A lot of people simple use the AMI id to select the appropriate image to deploy.
I have usually chosen (for the last 12 months at least) to use a filter and determine the AMI id dynamically.
This is important in AWS because each region has different AMI id’s. So simply using ami-xyz doesn’t work in another region.
To make my code more independant, I would rather filter the attributes of the image that I want and then select the appropriate AMI based on those attributes.
Using this method, my code can be used in any region without changes (other than to the variables that name things particular ways).
ami = aws.ec2.get_ami(most_recent=True,
                      owners=["099720109477"],
                      filters=[
                        aws.GetAmiFilterArgs(
                          name="name",
                          values=["ubuntu/images/hvm-ssd/ubuntu-focal-20.04*"]
                        ),
                        aws.ec2.GetAmiFilterArgs(
                          name="virtualization-type",
                          values=["hvm"]
                        ),
                        aws.ec2.GetAmiFilterArgs(
                          name="architecture",
                          values=["x86_64"]
                        ),
                      ],
)
The next section of code defines the security group that we will use. In this case, the security group is open to the world for ease of use with my buildkite agent.
group = aws.ec2.SecurityGroup(var_project_name + "-sg",
    description = var_project_name,
    vpc_id = vpc.id,
        ingress = [aws.ec2.SecurityGroupIngressArgs(
            protocol='-1',
            from_port=0,
            to_port=0,
            cidr_blocks=['0.0.0.0/0'],
        )],
        egress = [aws.ec2.SecurityGroupEgressArgs(
            protocol=-1,
            from_port=0,
            to_port=0,
            cidr_blocks=['0.0.0.0/0'],
        )],
        tags={
        "Name": var_project_name + "-sg"
        }
)
The next section fo code defines my user_data that I will send to my instance when it is instantiated. This represents the cloud-init portion of my pulumi infrastructure build.
The userdata, or cloud init portion installs my buildkite agent using the agent key defined in the buildkite portal.
Below that is the instatiation of the instance itself.
user_data = """#!/bin/bash
echo foo > /tmp/foo
FILE=/tmp/firstrun.log
if [ ! -e $FILE ]
then
 touch $FILE
 nohup $0 0<&- &>/dev/null &
 exit
fi

exec 1<&-
exec 2<&-
exec 1<>$FILE
exec 2>&1
echo "firstrun debug: starting-config"
sudo sh -c 'echo deb https://apt.buildkite.com/buildkite-agent stable main > /etc/apt/sources.list.d/buildkite-
agent.list'
sudo apt-key adv --keyserver hkp://keyserver.ubuntu.com:80 --recv-keys 32A37959C2FA5C3C99EFBC32A79206696452D198
sudo apt-get update && sudo apt-get install -y buildkite-agent
sudo sed -i "s/xxx/AGENT_KEY/g" /etc/buildkite-agent/buildkite-agent.cfg
echo "buildkite-agent ALL = NOPASSWD:ALL" | sudo EDITOR='tee -a' visudo
apt install -y docker.io
usermod -G docker buildkite-agent
systemctl enable docker
systemctl start docker
sudo systemctl enable buildkite-agent && sudo systemctl start buildkite-agent
"""


server = aws.ec2.Instance(var_project_name + "-server",
    instance_type = var_size,
    vpc_security_group_ids = [group.id],
    user_data = user_data,
    key_name = var_key_name,
    subnet_id = main_subnet.id,
    ami = ami.id,
    tags = {
        "Name": var_project_name + "-instance"
    },
)
The instance itself uses many of the variables and objects that have been defined up above. You will note that every object defined in the instance uses a variable that is defined elsewhere. This from the user data portion, and the security group through to the tags.
The last piece of the puzzle is simply displaying the IP addresses associated with my instance.
pulumi.export('public_ip', server.public_ip)
pulumi.export('private_ip', server.private_ip)
pulumi.export('public_dns', server.public_dns)
Build it
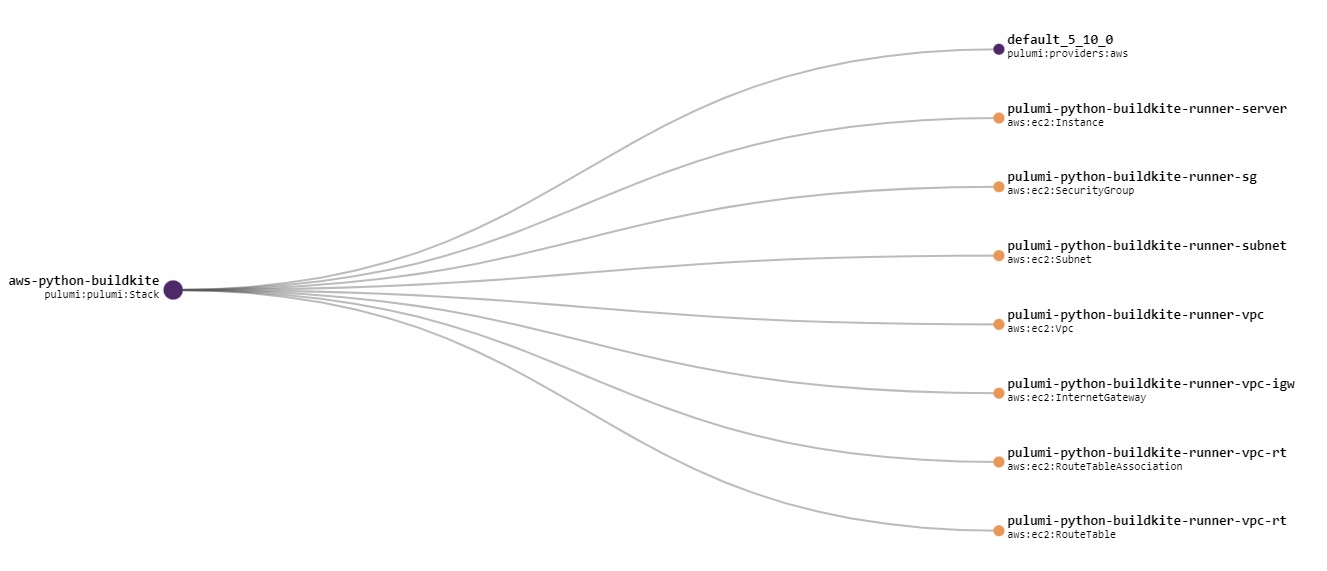
When we build my agent, pulumi sets up all of my infrastructure for me.
Resources:
    + 8 to create

Updating (buildkite)

View Live: https://app.pulumi.com/.....

     Type                              Name                                    Status
 +   pulumi:pulumi:Stack               aws-python-buildkite                    created (41s)
 +   ├─ aws:ec2:Vpc                    pulumi-python-buildkite-runner-vpc      created (1s)
 +   ├─ aws:ec2:InternetGateway        pulumi-python-buildkite-runner-vpc-igw  created (0.92s)
 +   ├─ aws:ec2:Subnet                 pulumi-python-buildkite-runner-subnet   created (11s)
 +   ├─ aws:ec2:SecurityGroup          pulumi-python-buildkite-runner-sg       created (3s)
 +   ├─ aws:ec2:RouteTable             pulumi-python-buildkite-runner-vpc-rt   created (1s)
 +   ├─ aws:ec2:RouteTableAssociation  pulumi-python-buildkite-runner-vpc-rt   created (0.82s)
 +   └─ aws:ec2:Instance               pulumi-python-buildkite-runner-server   created (22s)

Outputs:
    private_ip: "10.100.1.148"
    public_ip : "x.x.x.x"

Resources:
    + 8 created

Duration: 44s
Once it’s all built I can use the pulumi console to check it out. One of the nicer things I like is that you get a neat graph based view of all of the infrastructure coponents that you’ve just built…. and it’s all automagic!
Continuous Delivery
When we talk about continuous delivery, we often think of pipelines and other associated tooling. Really, continuous delivery is about deploying code or applications that are business critical in a timely fashion that is developer centric.
As a developer I don’t want to have a separate delivery mechanism for my application into DEV, QA or even production. I want to make that delivery mechanism part of my normal or “natural” development process.
This is where continuous delivery comes in. By making the delivery process part of my development process, I can simply check in my latest codebase and it gets delivered to the most relevant environment.
Buildkite
Buildkite is a CI system that is modern, cloud based and allows for ephemeral runners or agents in buildkite speak.
You can find out more about it at www.buildkite.com
Why is it so cool
I like it a lot because it’s simple to get up and running, has enough complixty in the pipelines that I can do anything, and integrates with just about any repository I generally use.
Why use it?
Buildkite’s speed to get up and running, and the fact that it takes care of a lot of the mundane things for you.
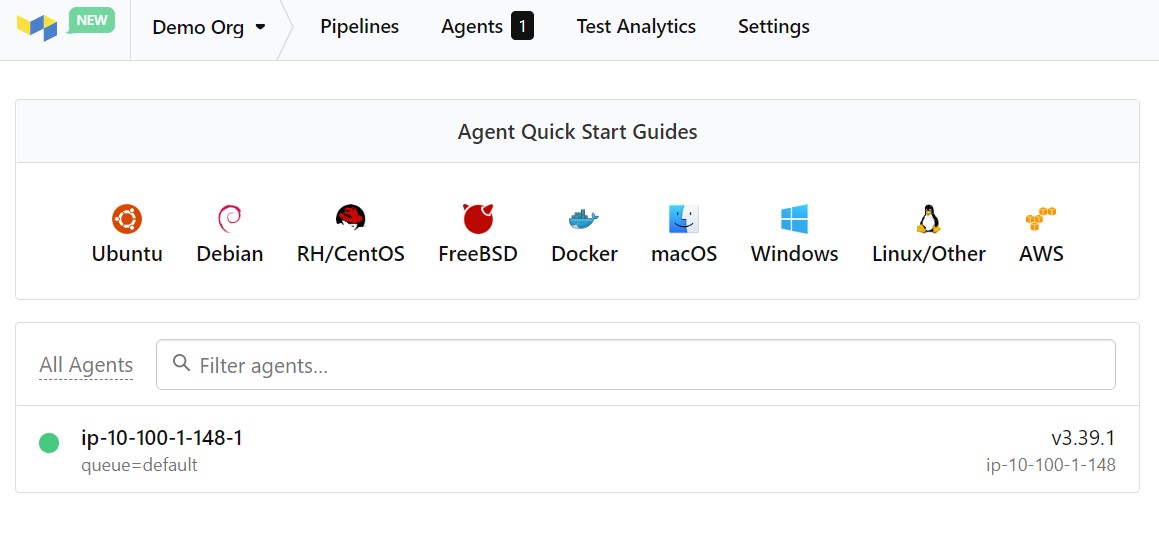
Buildkite Agent
In the first part of this blog, I built out a buildkite agent using Pulumi. Part of the user data on my agent, it automagically registers with buildkite. It looks like this.
Buildkite pipeline
My pipeline in buildkite is very simple, it doesn’t do a lot. It installs some stuff, and runs a pre deployment scan on some artifacts before I deploy.
The thing I like most is that there are two methods to creating and using a pipeline. You can do it all in the web interface (I’m sure people do it, but I don’t get it), or you can just include a pipeline.yml file in a directory in your repository.
I do the latter.
In order for this to work, you need to include the following into your pipeline definition in the web interface.
steps:
  - label: ":pipeline: Pipeline upload"
    command: buildkite-agent pipeline upload
This essentially tells buildkite that it is looking for your pipeline in your repository.
In my case, the pipeline is relatively simple.
steps:
  - label: "Install tooling"
    command: |
      echo -e "--- Installing \033[33mScanner\033[0m :heart:"
      sudo curl -sfL 'https://raw.githubusercontent.com/cli/main/install.sh' | bash
  - label: "Building Image"
    command: |
      echo -e "--- Building Image :heart::heart::heart:"
      docker build . -t swapi
  - label: "Running Scan"
    command: |
      echo "--- Running scan on branch $BUILDKITE_BRANCH "
      <scan-tool> -p happy-friday --api-token <token> image scan swapi
    if: build.branch == "dev"
  - label: "Running scan on branch $BUILDKITE_BRANCH"
    command: <scan-tool> --api-token <token> --project-key happy-friday-prod image scan swapi
    if: build.branch == "main"
  - label: "Running full scan"
    command: <scan-tool> --api-token <token> --project-key happy-friday-prod image scan swapi
    if: build.message =~ /^full/
Essentially this pipeline installs my scan tool, and then it runs the scan tool. I have some if statements that will run various combinations depending on the branch I am operating on, but the main thing here is that I have a simple pipeline that has the flexibility to run different things on different branches post commit.
Variables
Buildkite has a number of variables that are inbuilt to the platform. There are a lot of them. I am using only a few in my pipeline.
I am using the build.message variable to conditionally perform a step if the build message starts with the word full. This is not particularly elegant, but it does show the flexibility that you have in terms of buildkite.
I really like this because buildkite allows you to use regex in your conditions - this means that I can pretty much do anything.
I am also using the build.branch to select a step if the commit relates to a particular branch.
Steps
Steps in buildkite are easy to get up and running with. A step has a number of entities. A step can have a label, and can also have conditionals like I have above, can be tied to an agent queue and more.
agents:
  queue: "something"

steps:
  - command: "blah.sh"
  - command: "blahblah.sh"
  - label: "Yada"
    command: "yada.sh"
    agents:
      queue: "other"
In my case, my steps are very basic and just use a command and conditionals.
Conclusion
All in all, using pulumi to spin up my agents for buildkite lets me run agents and agent groups as part of my CI tooling that is very easy and is integrated into my developer workflow. Using buildkite gives me a great level of flexibility in my pipelines while also just having an easy button for getting up and running.
Look out for my next post where I will talk about pre-commit hooks and how they can be managed